Calculate Sprinkler Time
How much water do my sprinklers apply on the lawn? How long should I run my sprinklers? The “Tuna Can” or “Catch Cup” test can help you measure the amount of water your sprinklers apply. Then you can calculate how long to run your sprinklers for a healthy lawn that doesn’t waste water.

Many people over water their lawns because they don’t know how much water their sprinklers apply. There are many different types of sprinklers, including fixed spray, single-stream rotors, multi-stream rotors, drippers and more. Because each type of sprinkler applies water at different rates, it’s hard to know how long to water your lawn.
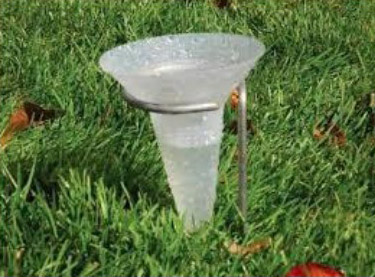
A Tuna Can Test (AKA Catch Cup Test) can help you determine how long to run your sprinkler system. You will need 10 tuna (or similarly shaped) cans, a ruler, and 10 minutes per sprinkler zone. If you prefer, there are specially made sprinkler catch cups, which may be easier to use because the measurements are marked on the side and the stake makes it easier to level the catch cups. Sprinkler catch cups can be found at local hardware stores or in the DIY Resources.
Tuna Can / Catch Cup Test
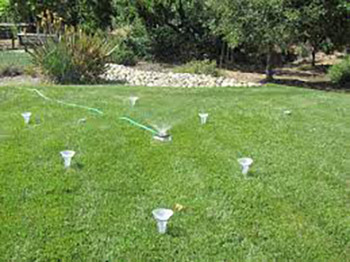
Step 1: Place Catch Cans
Place catch cans evenly across the lawn in a grid like pattern. You will need to test each zone individually and each sprinkler type (e.g., sprays, small rotors, large rotors, drip and more).
Tip: If using tuna or cat food cans you may need to put small rocks in the bottom to keep the cans level on the grass.
Step 2: Run Sprinklers
Turn on a sprinkler zone and let it run for 10 minutes.
Step 3: Measure and Record the Amount of Water Collected
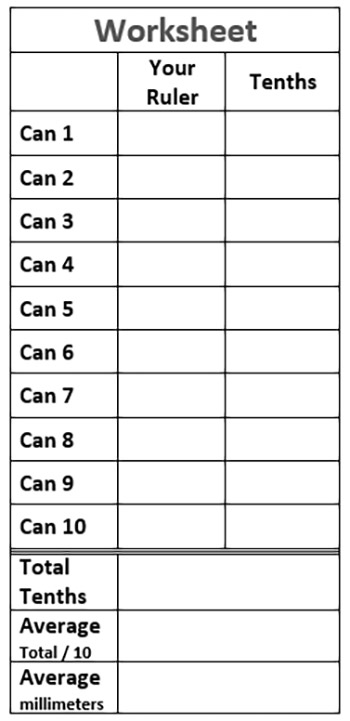
Measure and record the amount of water captured in each of your catch cans on a worksheet and use the estimation table to convert to tenths of inches and millimeters.
Tip: Remove the rocks from the tuna or cat food cans and place the ruler in the center of the can.

Step 4: Sprinkler Distribution Uniformity
For each zone: If the water levels in all the catch cans are equal or near equal your sprinkler system is distributing water evenly. Proceed to Step 5.
Step 4 a: Sprinkler Repair and Retrofit
If the water level varies from one catch can to the next:
STOP and adjust your sprinkler heads or nozzle sizes to distribute the water more evenly.
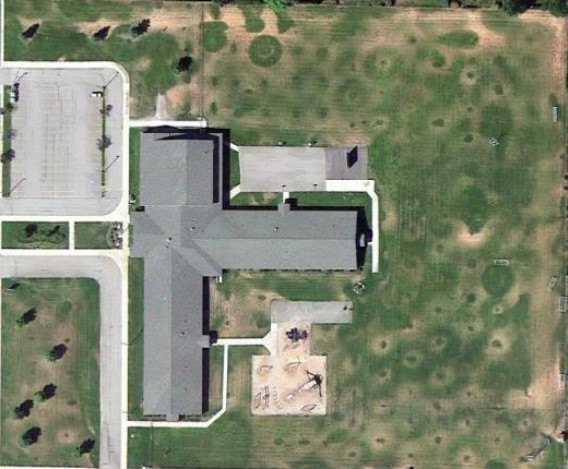
You may need to change the placement of some sprinklers to ensure the coverage of your lawn is even. To the right is a photo showing a school yard where the sprinklers are not distributing water uniformly. If your system needs repair or retrofitting check out the Nerds Sprinkler Systems, Find a Professional, and DIY Resources. When the repair or retrofit is complete proceed to step 4b.
Step 4b: Repeat the Catch Can Test
Repeat the catch can test for each zone and make any needed adjustments. When your sprinklers are distributing water uniformly, proceed to Step 5.
Step 5: Find the Average Amount of Water in the Catch Cans
For each zone, add all the amounts of water in the catch cans together and then divide by the number of catch cans you used to get an average amount of water per catch can. Record the average in tenths of inches. (See the Estimates Chart) Tenths of inches will allow you to compare to compare with Seasonal Water Needs charts. See Step 6 for examples.
Step 6: Find Sprinkler Run Time
To find out how many minutes to run your sprinklers:
Calculate: Seasonal Water Need x 10 Minutes ÷ Catch Can Average Sprinkler Rate = Sprinkler Run Time
Example 1: If April 6th 3-Day Seasonal Water Need is .18 of an inch and in 10 minutes the catch can test measurers 0.4 of an inch then the sprinkler run time is 0.18 x 10 = 1.8 divided by 0.4 = 4.5 minutes.
Example 3: If July 14th 3-Day Seasonal Water Need in 0.59 and in 10 minutes the catch can test measurers 0.4 of an inch, then the sprinkler run time is 0.59 x 10 = 5.9 divided by 0.4 = 14.75 minutes.
Example 2: If April 18th 3-Day Seasonal Water Need is .39 of and inch and in 10 minutes the catch can test measurers 0.4 of an inch then the sprinkler run time is 0.39 x 10 = 3.9 divided by 0.4 = 9.75 minutes.
Example 4: If September 24th 3-Day Seasonal Water Need is 0.28 and in 10 minutes the catch can test measurers 0.4 of an inch, then the sprinkler run time is 0.28 x 10 = 2.8 divided by 0.4 = 7 minutes.
Step 7: Set your sprinklers to water before 9:00 am or after 6:00 pm
Avoid watering in the heat of the day when water is lost to evaporation. Set your sprinklers to finish running before 9:00 am or start running after 6:00 pm.
Step 8: Watch, Test, and Adjust
Keep an eye on your lawn over the next week.
-If the lawn appears thirsty increase your watering time by 10% – 20% (i.e., 10% increase 15-17 minutes or 20% increase 15-18 minutes.)
-If the lawn appears waterlogged reduce your watering time by 10% – 20% (i.e., 10% decrease 15-13 minutes or 20% decrease 15 – 12 minutes.)
Step 9: Perform the shovel test to look at root zone depth.
Jab a shovel into the lawn and pull back on the handle. If the root zone of the grass is 3 inches or more deep, you can use the run time calculation above. If the root zone depth less than 3 inches, you should increase your watering time about 10% and learn more about how to increase root zone depth.
Step 10: Seasonal Watering Needs
Remember to adjust your sprinkler run time with the changing temperatures. See the Seasonal Watering Needs for changing watering needs from April to October.
TIP: Brown grass does not mean your lawn is dead. It means it is going dormant. Once your grass is brown, it does not need water or fertilizers.
TIPS: Below are links to other sections of the Outdoor Watering Nerds website that can help you improve the health of your lawn and increase watering efficiency.
• Cycle Soak Programming to prevent runoff
• Soil Moisture Testing
• Increasing Root Zone Depth
Watch the video below to learn how to optimize your watering schedule using catch cups.